> ## Documentation Index
> Fetch the complete documentation index at: https://developer.z-api.io/llms.txt
> Use this file to discover all available pages before exploring further.
# How to connect
> Connect your Z-API account to the MCP server and authorize your AI app
The Z-API MCP server can be connected to any MCP-compatible AI application (Claude, ChatGPT, custom agents, among others). The process is always similar: add the server as a connector/custom tool and authorize access to your instance.
Below we show the step-by-step using **Claude** as an example, since it's one of the most widely used AI apps — but the logic is the same in any MCP client.
### 1. Open Connector settings
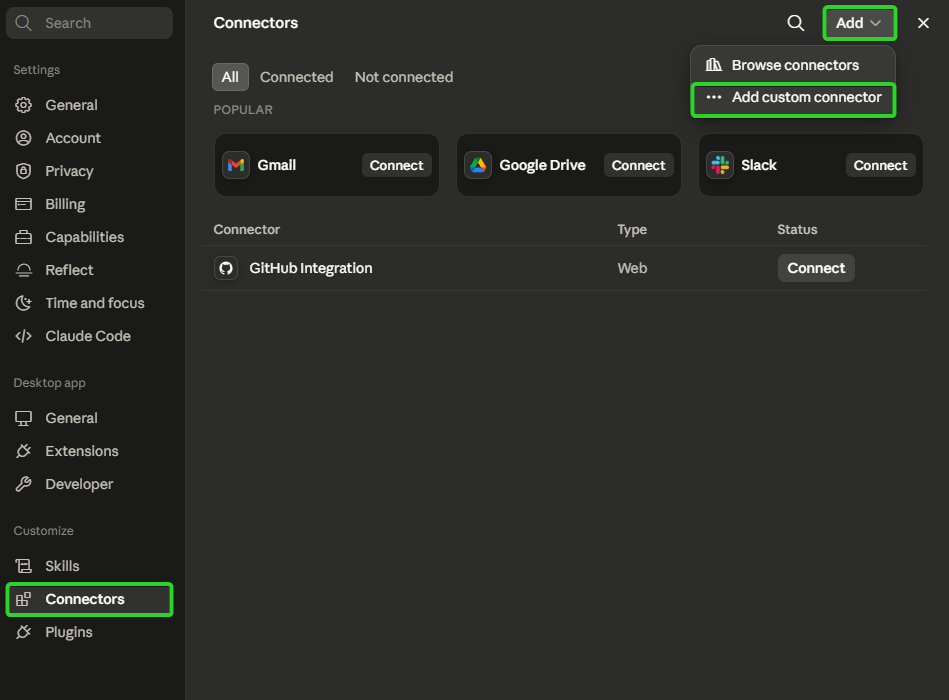
In Claude, go to **Settings → Connectors**. Click the **Add** menu in the top right corner, and select **Add custom connector**.
 ### 2. Fill in the server name and URL
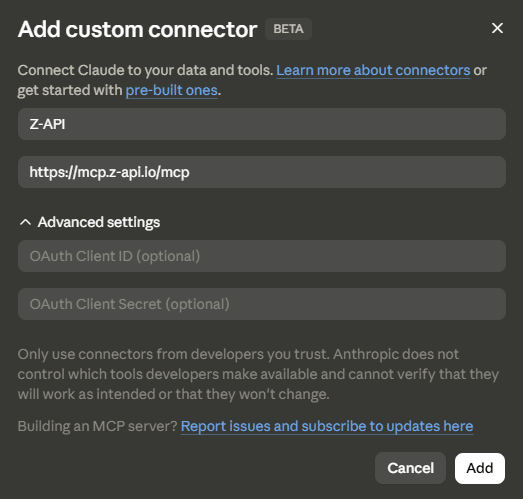
In the **Add custom connector** window, enter:
* **Name**: whatever name you prefer — we use `Z-API` here just as a suggestion, to make it easier to identify later
* **MCP server URL**: `https://mcp.z-api.io/mcp`
### 2. Fill in the server name and URL
In the **Add custom connector** window, enter:
* **Name**: whatever name you prefer — we use `Z-API` here just as a suggestion, to make it easier to identify later
* **MCP server URL**: `https://mcp.z-api.io/mcp`
 Click **Add**. The Z-API connector will appear in the connectors list, still shown as **not connected**.
### 3. Link your instance
Open the **Z-API** connector in the list and click **Connect**.
Click **Add**. The Z-API connector will appear in the connectors list, still shown as **not connected**.
### 3. Link your instance
Open the **Z-API** connector in the list and click **Connect**.
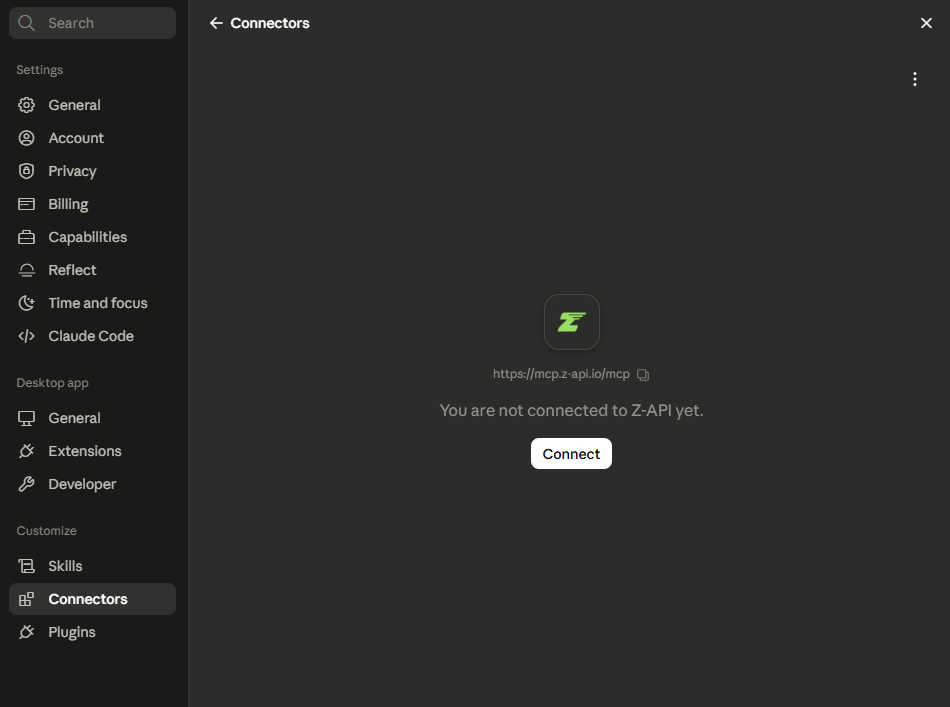 This opens a browser tab to authorize the connection. You need to be **logged in to the Z-API platform** to proceed — if you aren't, you'll be prompted to log in before the instance list is shown.
Choose which **instance** of your Z-API account you want to authorize. Find the desired instance in the list (you can use the search bar) and click **Select**.
This opens a browser tab to authorize the connection. You need to be **logged in to the Z-API platform** to proceed — if you aren't, you'll be prompted to log in before the instance list is shown.
Choose which **instance** of your Z-API account you want to authorize. Find the desired instance in the list (you can use the search bar) and click **Select**.
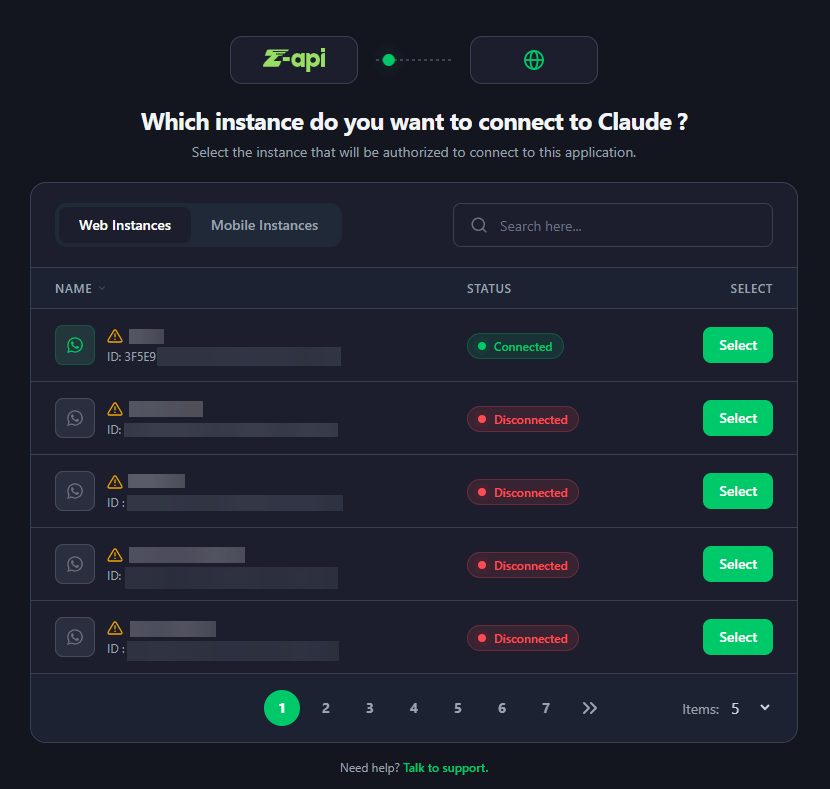 If the selected instance is **disconnected from WhatsApp** (QR Code not scanned), linking the MCP connector won't connect WhatsApp automatically. You'll still need to go to the Z-API dashboard and scan the QR Code the usual way to bring the instance online.
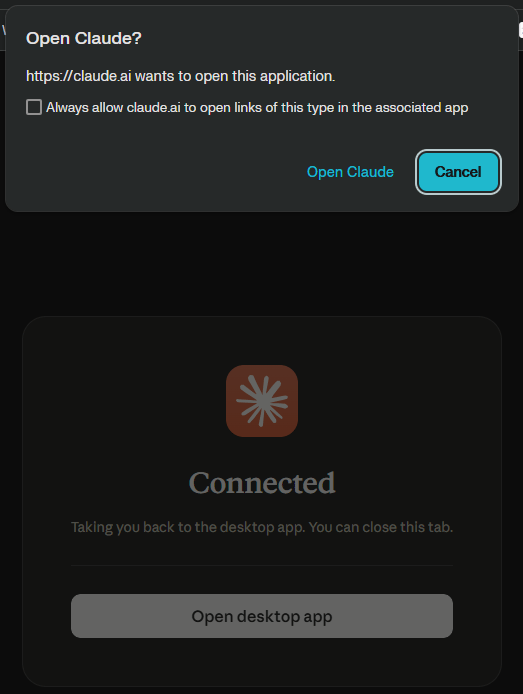
After selecting the instance, confirm by clicking **Open Claude** (or **Open desktop app**, if you're using the desktop app) to automatically return to Claude.
If the selected instance is **disconnected from WhatsApp** (QR Code not scanned), linking the MCP connector won't connect WhatsApp automatically. You'll still need to go to the Z-API dashboard and scan the QR Code the usual way to bring the instance online.
After selecting the instance, confirm by clicking **Open Claude** (or **Open desktop app**, if you're using the desktop app) to automatically return to Claude.
 ### 4. Ready to use
Once the instance is selected, the connection is established automatically, making all MCP-compatible Z-API endpoints available — such as sending text, image, and video messages, group management, and other currently supported features — for direct use by Claude.
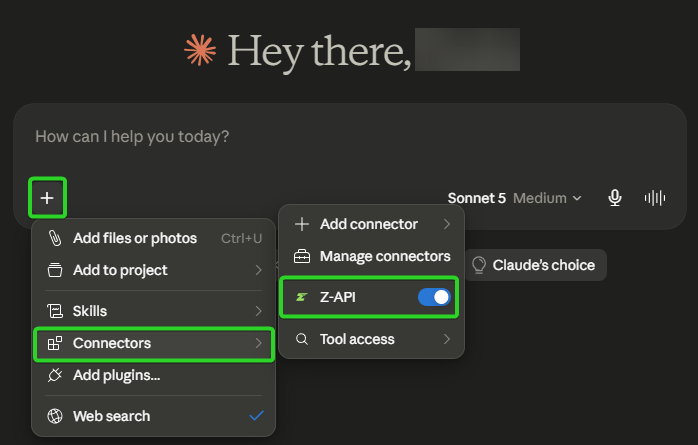
To use the connector in a conversation, click the **+** icon next to the message field, go to **Connectors**, and turn on the **Z-API** toggle.
### 4. Ready to use
Once the instance is selected, the connection is established automatically, making all MCP-compatible Z-API endpoints available — such as sending text, image, and video messages, group management, and other currently supported features — for direct use by Claude.
To use the connector in a conversation, click the **+** icon next to the message field, go to **Connectors**, and turn on the **Z-API** toggle.
 Done! The AI is now connected to your Z-API instance. Just ask it, in natural language, to send a message, an image, create a group, or perform any of the available actions — it will identify the right tool and make the request for you.
Once connected, the AI app will show up under the **Connected Apps** tab, inside your instance's dashboard on Z-API. That's where you can check when it was connected, its last use, and remove access whenever you want.
***
## Authentication
The connection is made via **OAuth**, linking the chosen Z-API instance directly to the connector in your AI app. The AI never accesses your WhatsApp password or credentials directly — only the authorized endpoints of the selected instance.
Disconnecting **WhatsApp** from the instance (scanning the QR Code again) does **not** automatically revoke the AI app's access. The two connections are independent.
To revoke the AI's access, go to the **Connected Apps** tab in your Z-API instance dashboard and remove the app from there — this ends access immediately, with no need to change anything in the AI app's settings.
***
## Frequently asked questions
No. These are two independent connections. Disconnecting WhatsApp from the instance doesn't remove the AI app or revoke its authorization — access stays active until you remove it manually from the **Connected Apps** tab in the instance dashboard.
Go to your instance's dashboard on Z-API, open the **Connected Apps** tab, and remove the app from there. This ends access immediately, without affecting the WhatsApp connection.
**(1)** Is the Z-API connector enabled for this conversation? **(2)** Is the selected instance connected and active in the Z-API dashboard? **(3)** Has the link/token expired? If so, unlink and reconnect the connector in the AI app's settings. If the issue persists, contact technical support.
No. Once added and linked, the connector remains available to be enabled in any new conversation through the connectors menu.
Done! The AI is now connected to your Z-API instance. Just ask it, in natural language, to send a message, an image, create a group, or perform any of the available actions — it will identify the right tool and make the request for you.
Once connected, the AI app will show up under the **Connected Apps** tab, inside your instance's dashboard on Z-API. That's where you can check when it was connected, its last use, and remove access whenever you want.
***
## Authentication
The connection is made via **OAuth**, linking the chosen Z-API instance directly to the connector in your AI app. The AI never accesses your WhatsApp password or credentials directly — only the authorized endpoints of the selected instance.
Disconnecting **WhatsApp** from the instance (scanning the QR Code again) does **not** automatically revoke the AI app's access. The two connections are independent.
To revoke the AI's access, go to the **Connected Apps** tab in your Z-API instance dashboard and remove the app from there — this ends access immediately, with no need to change anything in the AI app's settings.
***
## Frequently asked questions
No. These are two independent connections. Disconnecting WhatsApp from the instance doesn't remove the AI app or revoke its authorization — access stays active until you remove it manually from the **Connected Apps** tab in the instance dashboard.
Go to your instance's dashboard on Z-API, open the **Connected Apps** tab, and remove the app from there. This ends access immediately, without affecting the WhatsApp connection.
**(1)** Is the Z-API connector enabled for this conversation? **(2)** Is the selected instance connected and active in the Z-API dashboard? **(3)** Has the link/token expired? If so, unlink and reconnect the connector in the AI app's settings. If the issue persists, contact technical support.
No. Once added and linked, the connector remains available to be enabled in any new conversation through the connectors menu.